

A Bevelhead Update
In previous posts, I’ve updated our progress on the bevelhead removal and re-building effort. I disassembled the bevelhead which was fairly easy to do. I explained that the output shaft and bearing was smooth and clean, and therefore, did not need to be rebuilt. This is written with the intent to help anyone faced with a lot of corrosion on their bevelhead and how to rebuild their assembly.
Our main issue has been the input shaft assembly which was found as-is with full corrosion of the upper seal. I had no drawings available, and I did not really understand how this assembly was designed. After poking around, I decided that the input shaft was held in place by at least one bearing and that I would have to remove the shaft by pushing/forcing it out of the housing.
After pounding, pulling and picking away at it, I was able to reverse engineer the design of the housing below:
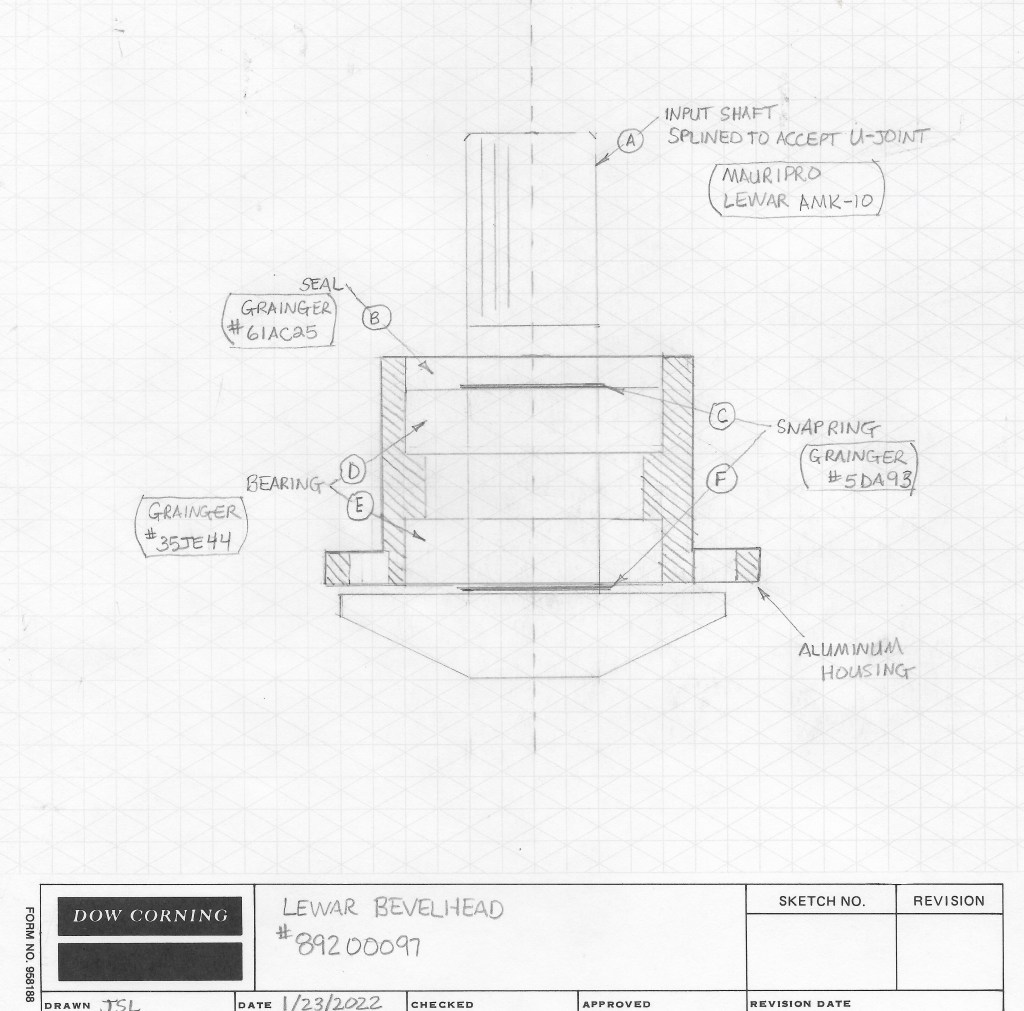
Here are the main parts:
A) Input shaft is 1″ diameter with the upper section having splines where the upper u-joint is secured. The shaft is solid and runs through the housing and connects to the input gear. There are TWO snapring grooves in this shaft as shown.
B) The seal is a standard oil seal readily available from Grainger
C and F) The snapring is also readily available from Grainger
D and E) The ball bearings are 1″ ID and 2″ OD readily available from Grainger
Not knowing the design, I decided that the shaft must be forced out of the housing from the top to the bottom. I attempted to use a seal puller to use force at the end of the shaft, but that didn’t work. Then for whatever reason I supported the bottom of the housing on top of a vise with the jaws opened wide and start pounding on the top of the shaft. I thought I could easily force the shaft down out of the housing. That was a major error on my part, because the upper snapring was holding the shaft in vertically (unbeknownced to me), and the shaft had corroded and seized onto the the upper and lower bearings. I ended up damaging the housing and also the splines at the very end of the input shaft.
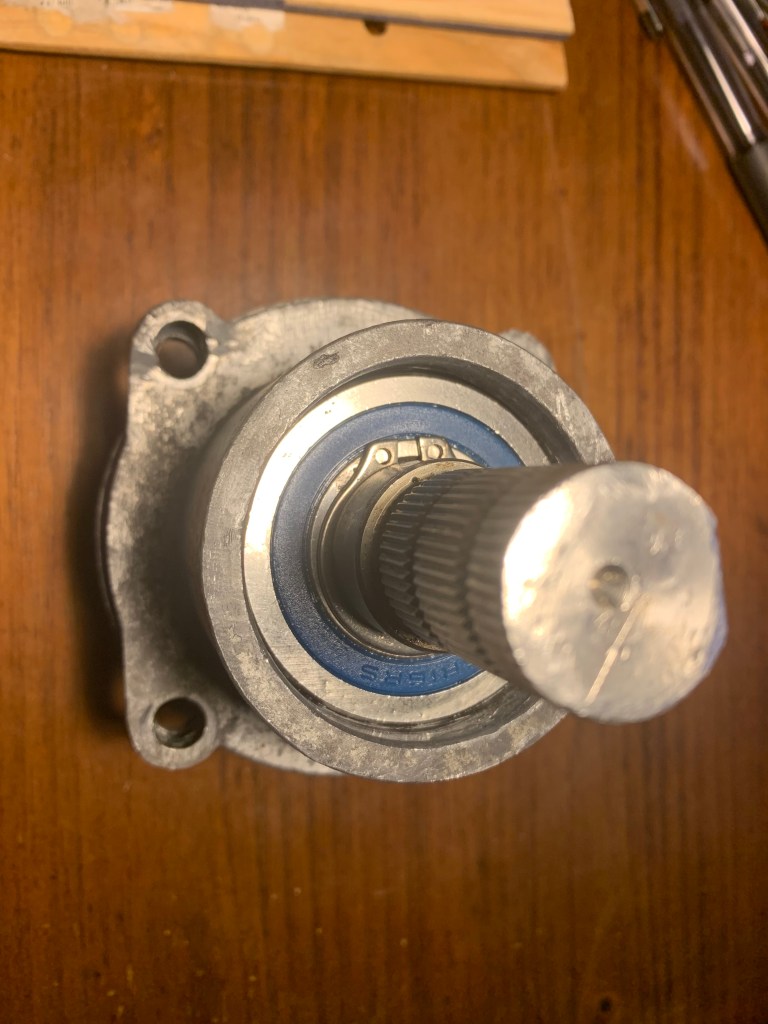
What I found was the oil seal was completely corroded and could easily be drilled into and chiseled out with a screwdriver. The upper snapring was completely corroded and seized onto the shaft. I had to spray it with CorrosionX. The upper bearing was also fully corroded and the inner race had seized onto the shaft. That also got the CorrosionX treatment. The lower bearing just started corroding with the upper seal already delaminating away from the races. The lower snapring was intact with some minor surface corrosion. Once I pried off the upper snapring, I returned to the hammer and block of wood to easily pound out the shaft.
After I picked up the replacement parts, I put the shaft and the bearings in the freezer and the body and snapring in the oven at 200F. After 15 minutes, I could just drop the bearings into the body without force. Then, a few minutes later when the bearings warmned up, I pulled the shaft out of the freezer and it slid easily through the inner race of both bearings. I wiped some grease in between the bearings before I installed the shaft, then I put the snapring on. That’s it.
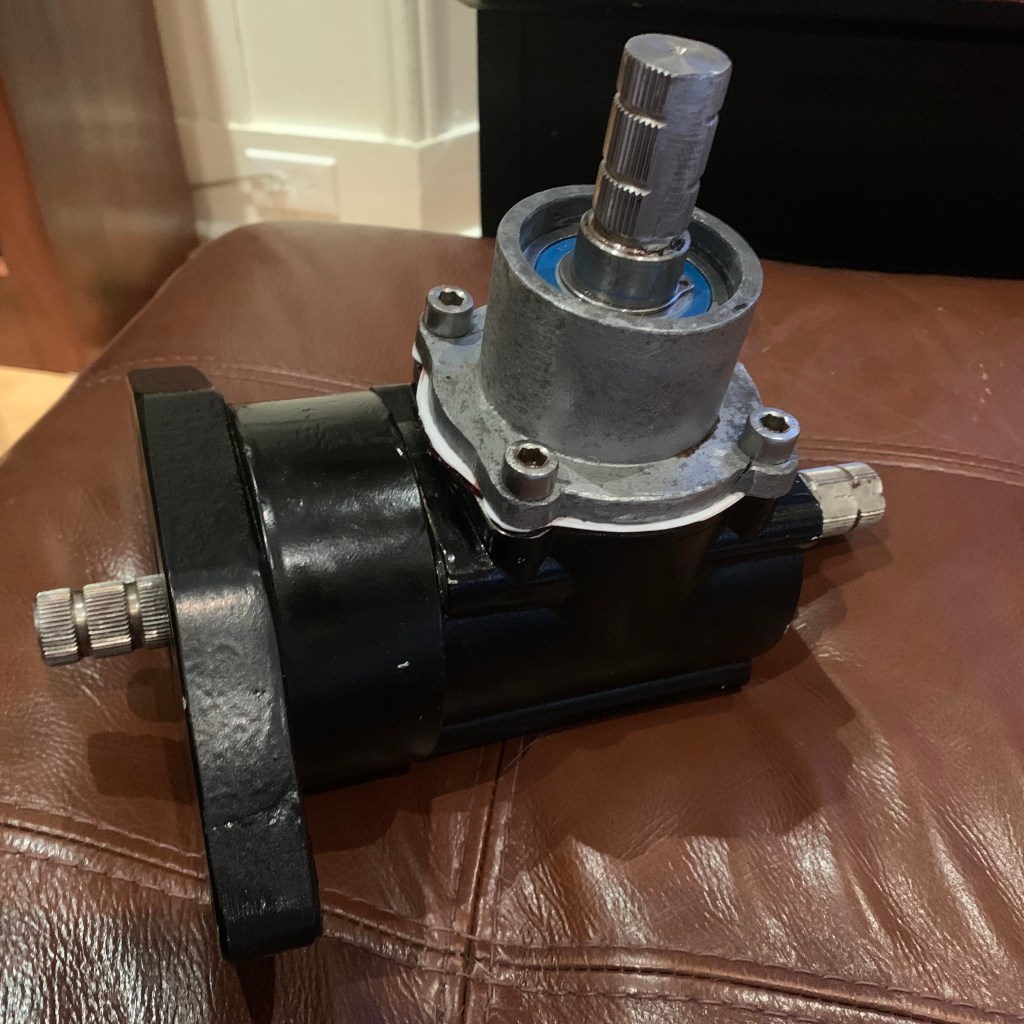
I may be able to ressurect this assembly, and therefore, use this as a “spare” bevelhead, so I will continue to finish the assembly, make repairs and test. At this time, the correct bevelhead is not stocked by Lewmar and is considered a custom order with 10-12 weeks lead time. The cost of this is in the $1400 range after discount. The cost of the bearings, snaprings, and seal is under $100. If I had been more patient, I could have avoided the expense of purchasing a new unit. I decided to purchase a new bevelhead to ensure that we have a pristine one on the boat.
Thruhull Planning, Design and Procurement
The only way I could get my head around what needed to be purchased was to draw up diagrams of each thru-hull. These sketches show exactly the parts that need to be procured and connected together. Doing things this way helps to make sure we don’t forget some particular detail which can derail and slow down any installation effort. Taking this approach helps to ensure we know how the parts are designed and clear up any assumptions. An example is hose sizes: Should you buy full flow fittings? You have to get down to this level of detail before you go spend a lot of money on parts and fittings.
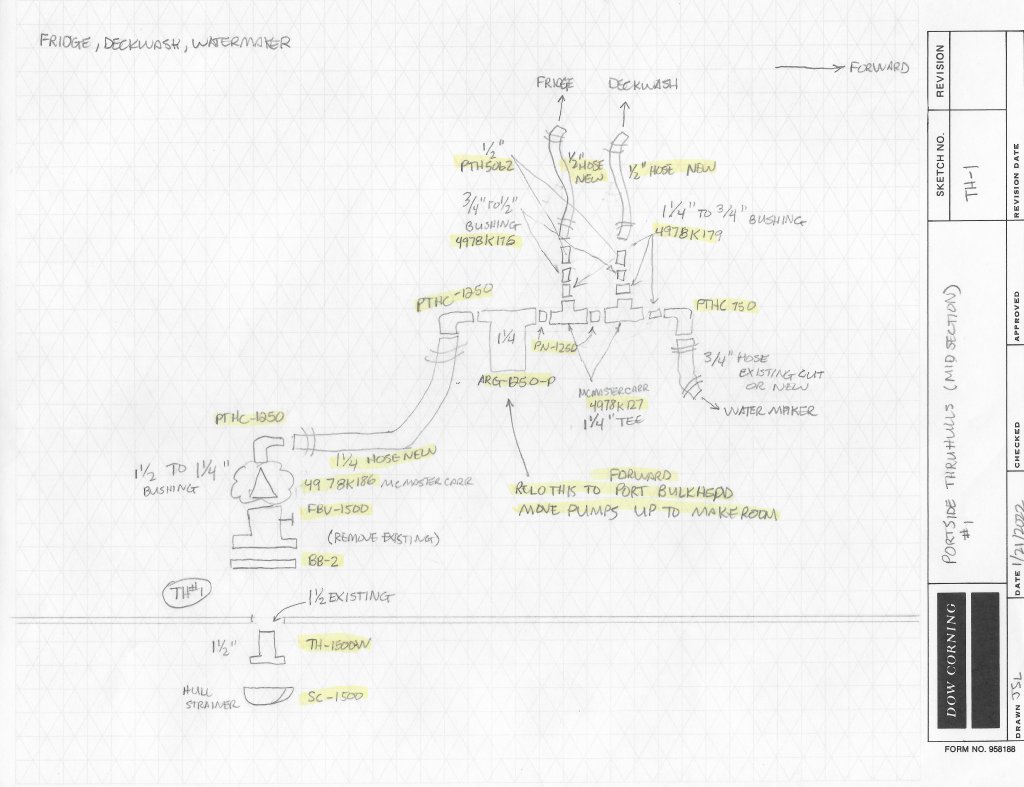
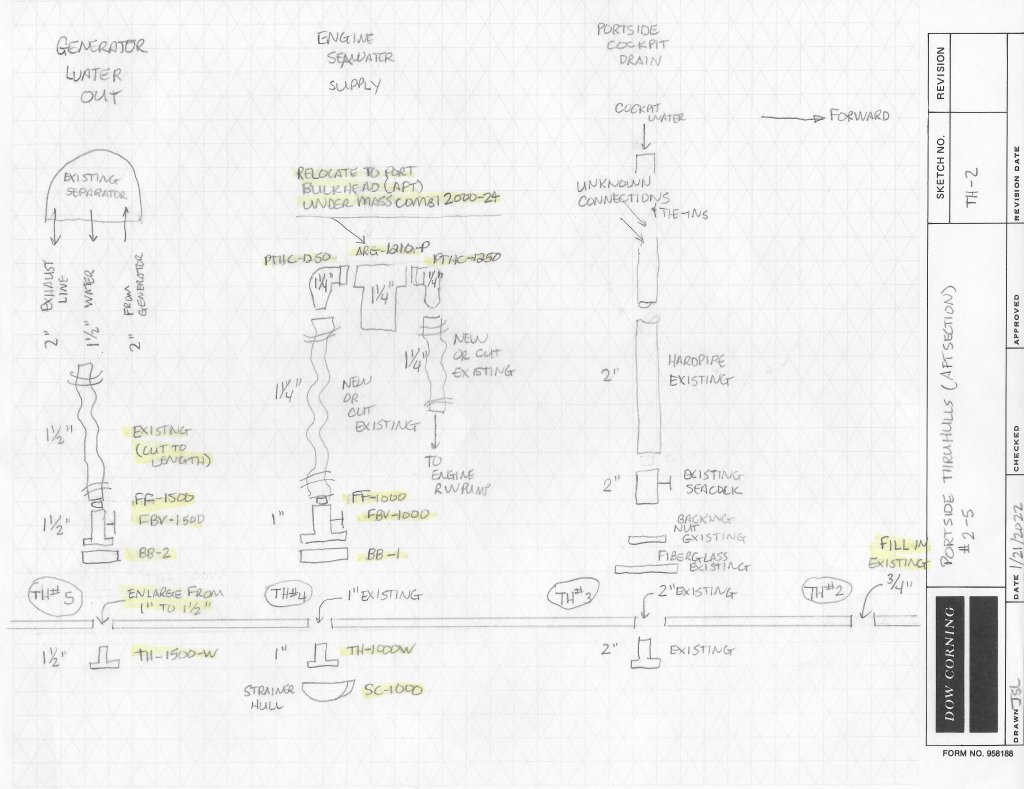
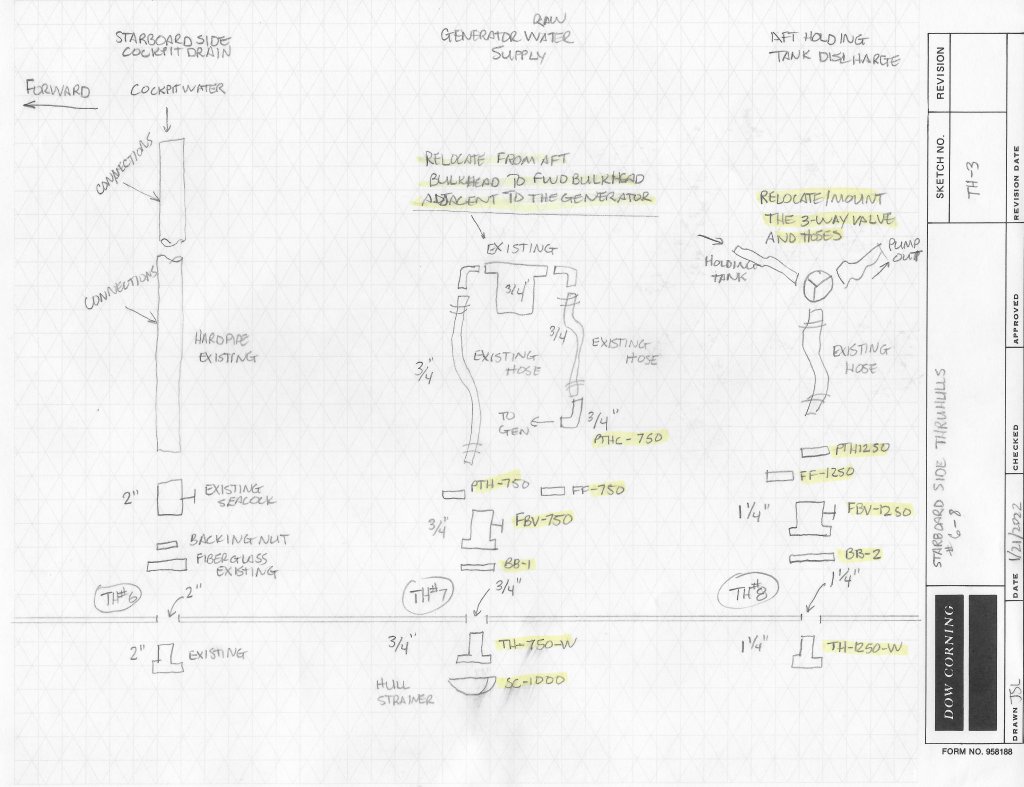
Now that we have a good set of drawings and scope we can make a single shopping list for all of the parts. I used the Defender website to create a shopping cart that we could use when we walked around the store to check off each item as we put it in our actual shopping cart. It worked brilliantly.
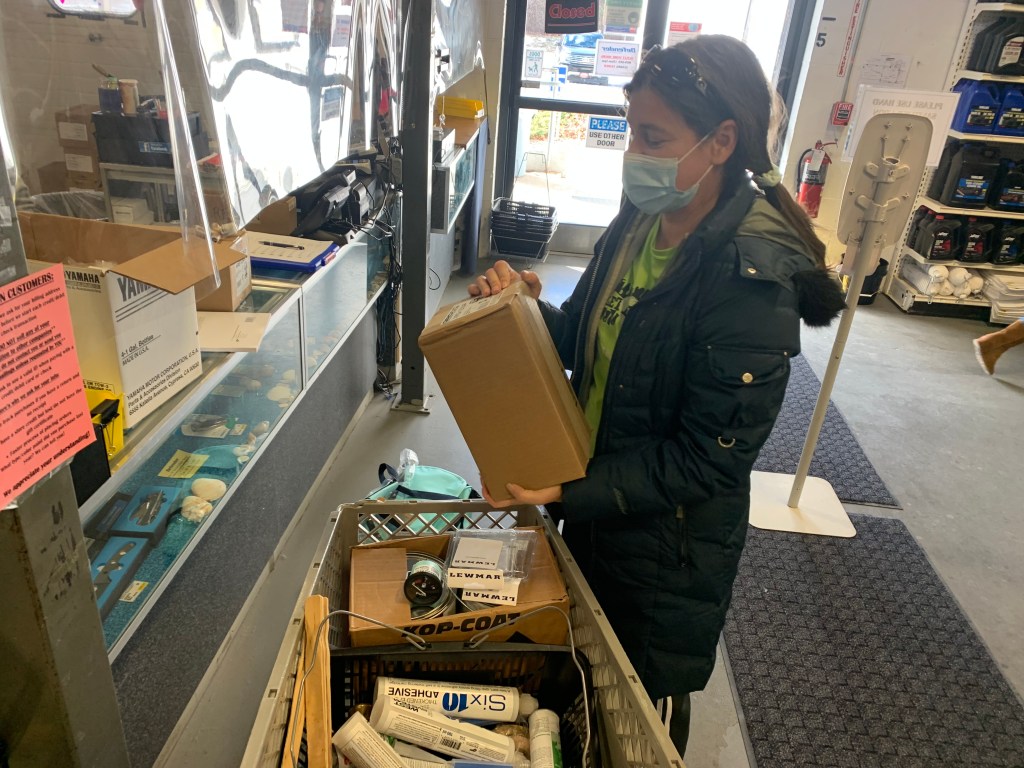


Once we got the parts to our home, we spread them out and organized each one in accordance with the way it would be installed on the boat and then we “kitted” these into boxes. Now we are fully prepared for the installation. But the one thing we are aware of is that we anticipate having to make changes based on issues we may encounter during the installation.
