In case some of you are considering a teak deck replacement, I thought it would be valuable to share some tips and lessons learned from this big project as well as brag about some things that we really liked throughout this process.
Why did we do it?
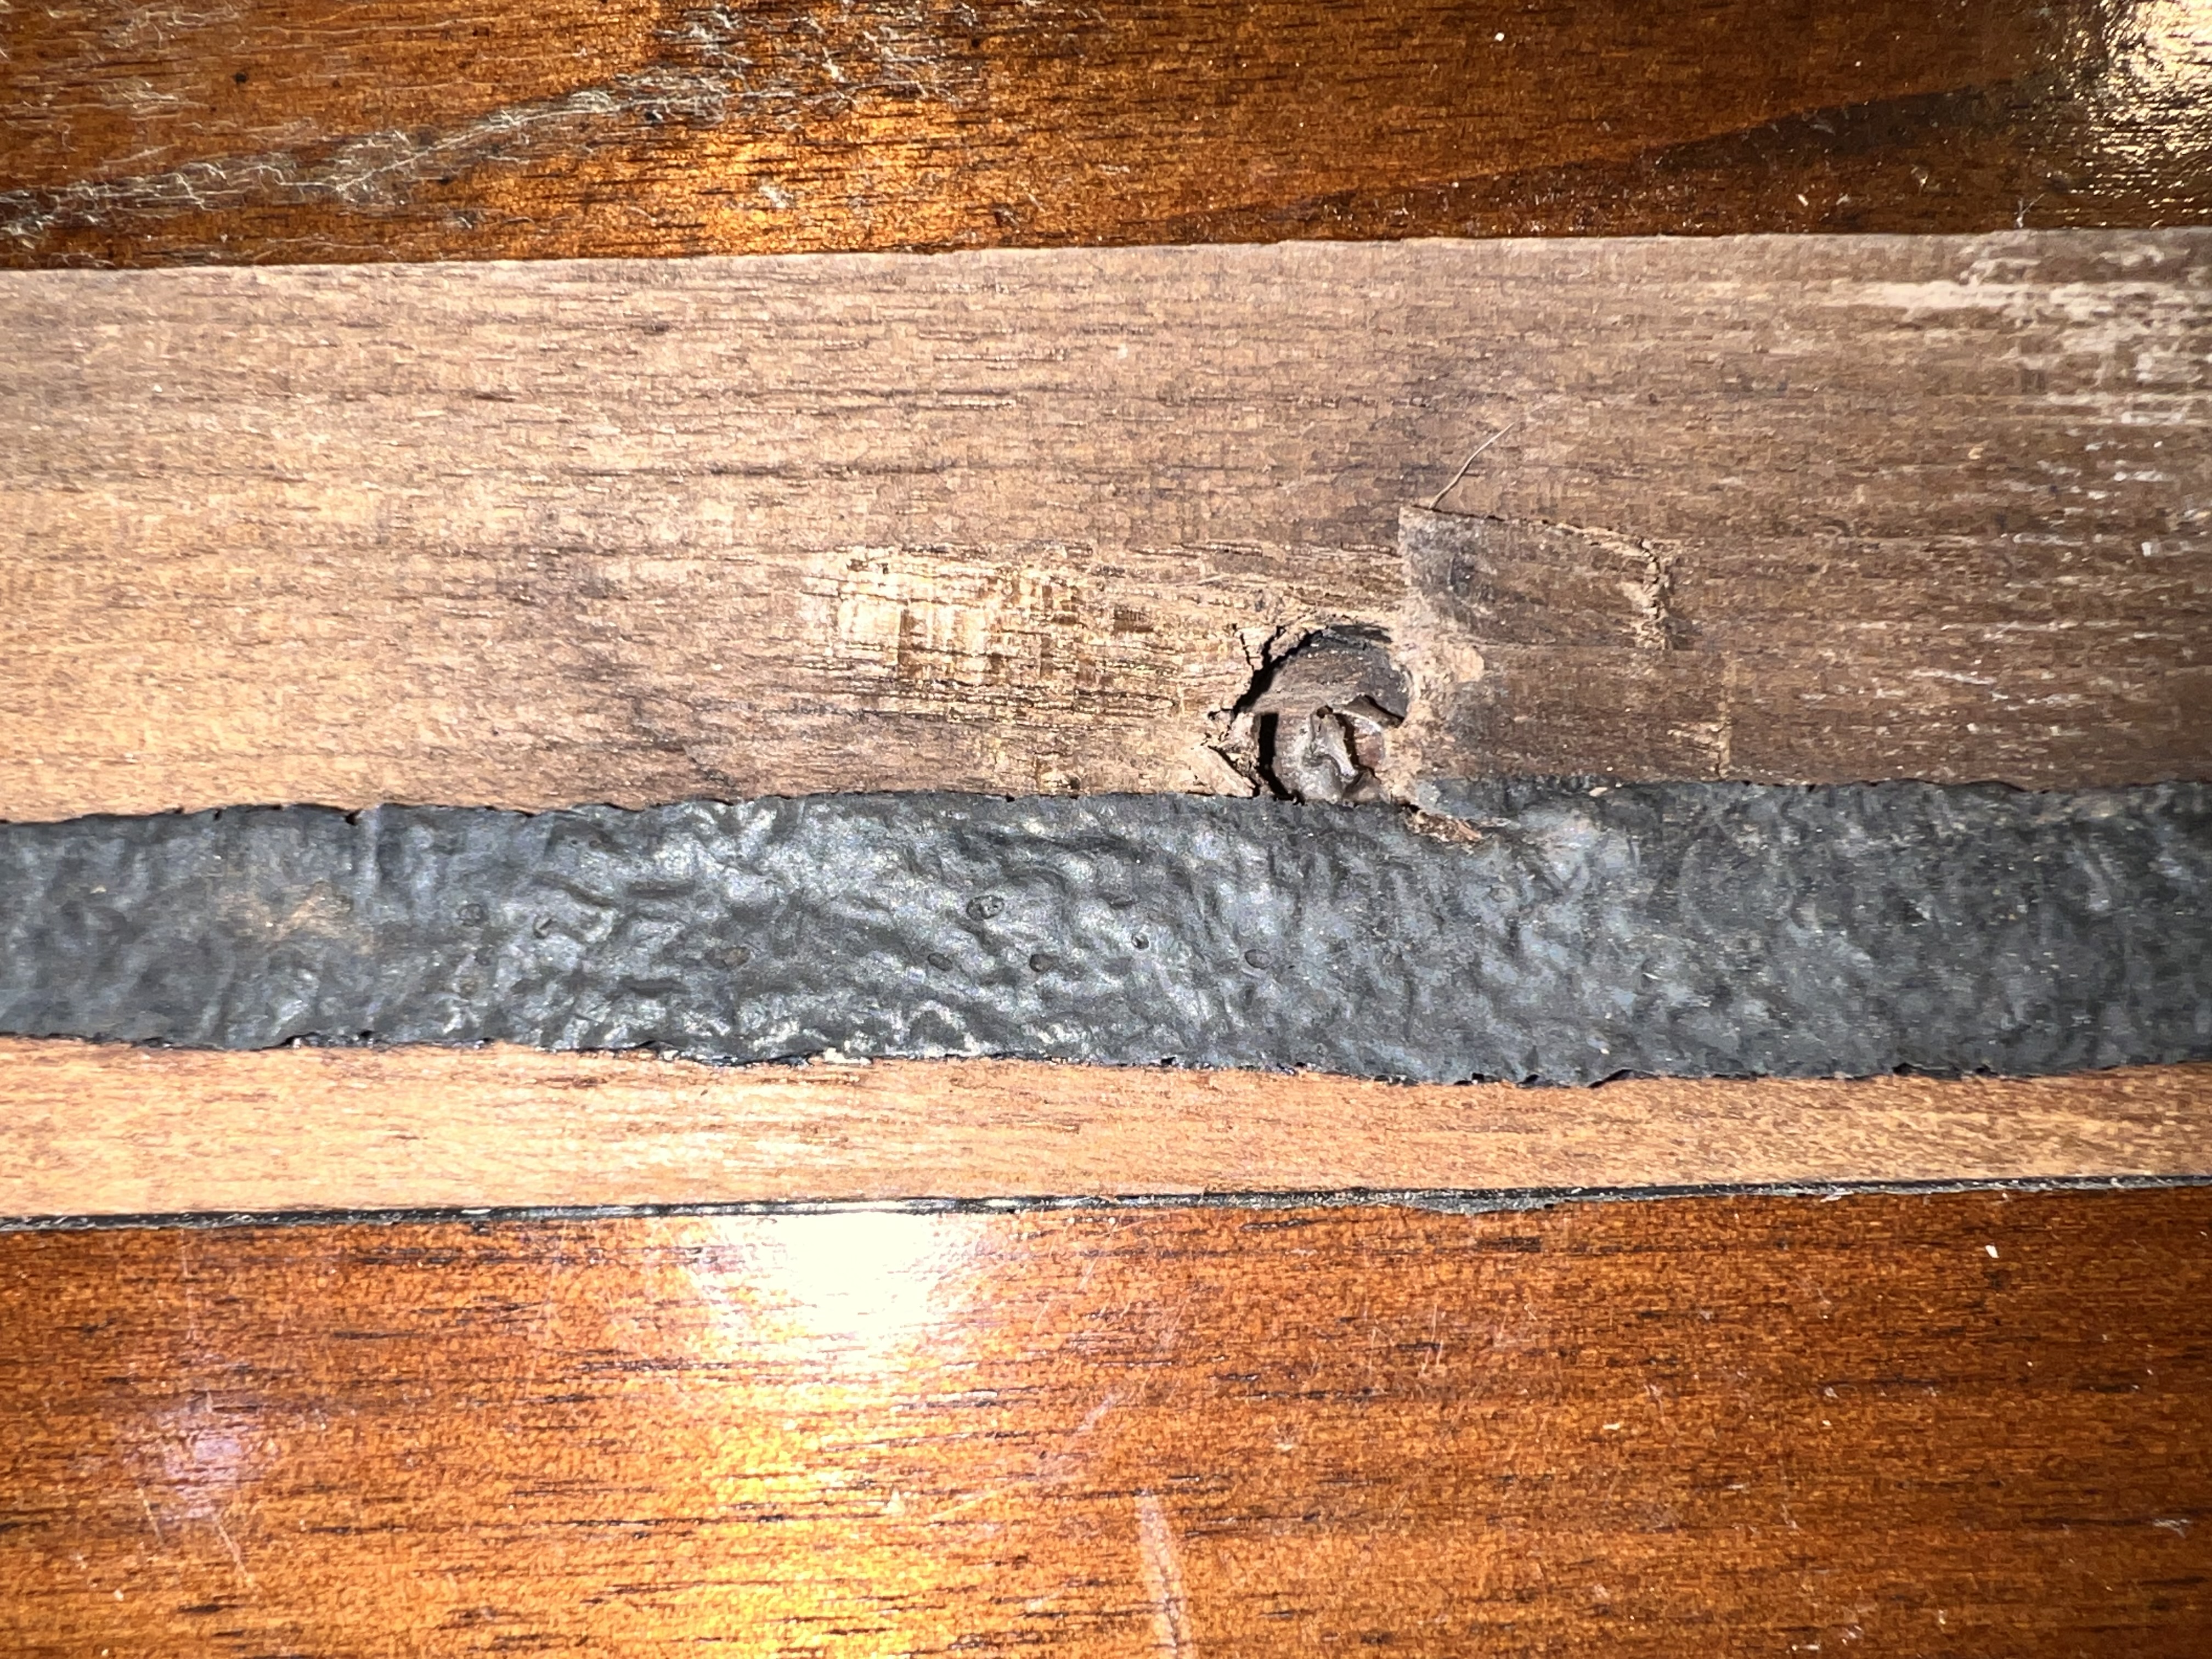
We pulled a piece of “good” teak from the rubble during the deck removal process to analyze it. The rabbets in between each piece of teak where the caulk is poured were getting very thin. In this one example, we had less than 1.5 mm of rabbet to lay down caulk. We would have had to route all of the rabbets by at least 1.5-3.0 mm in order to achieve a sufficient bonding surface for new caulk. That would be every single rabbet with a router and a steady hand. It would have taken a long time. Before doing that, we would have had to sand down the original deck to make it flat so that the router would have a flat edge to run along. So we would have removed 1-2 mm of top surface across the entire boat. Then route down 3 mm from that at each edge where the rabbets (caulk lines/joints) were. We would have been left with a fragile 1-2 mm of teak at the bottom of each rabbet.
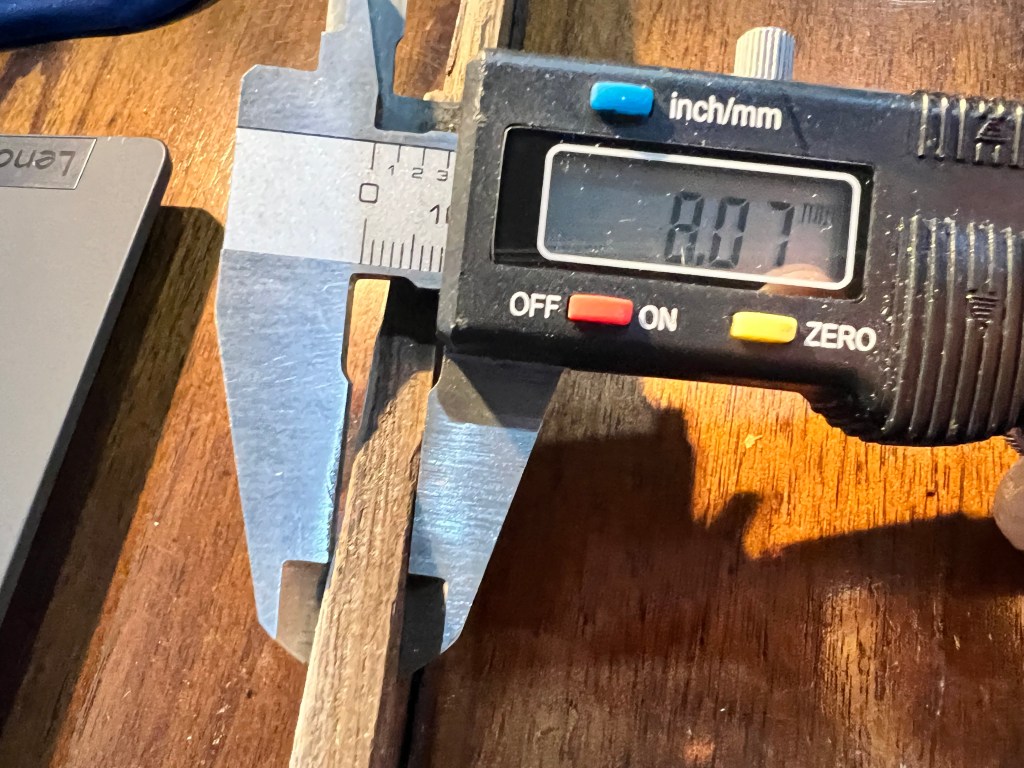

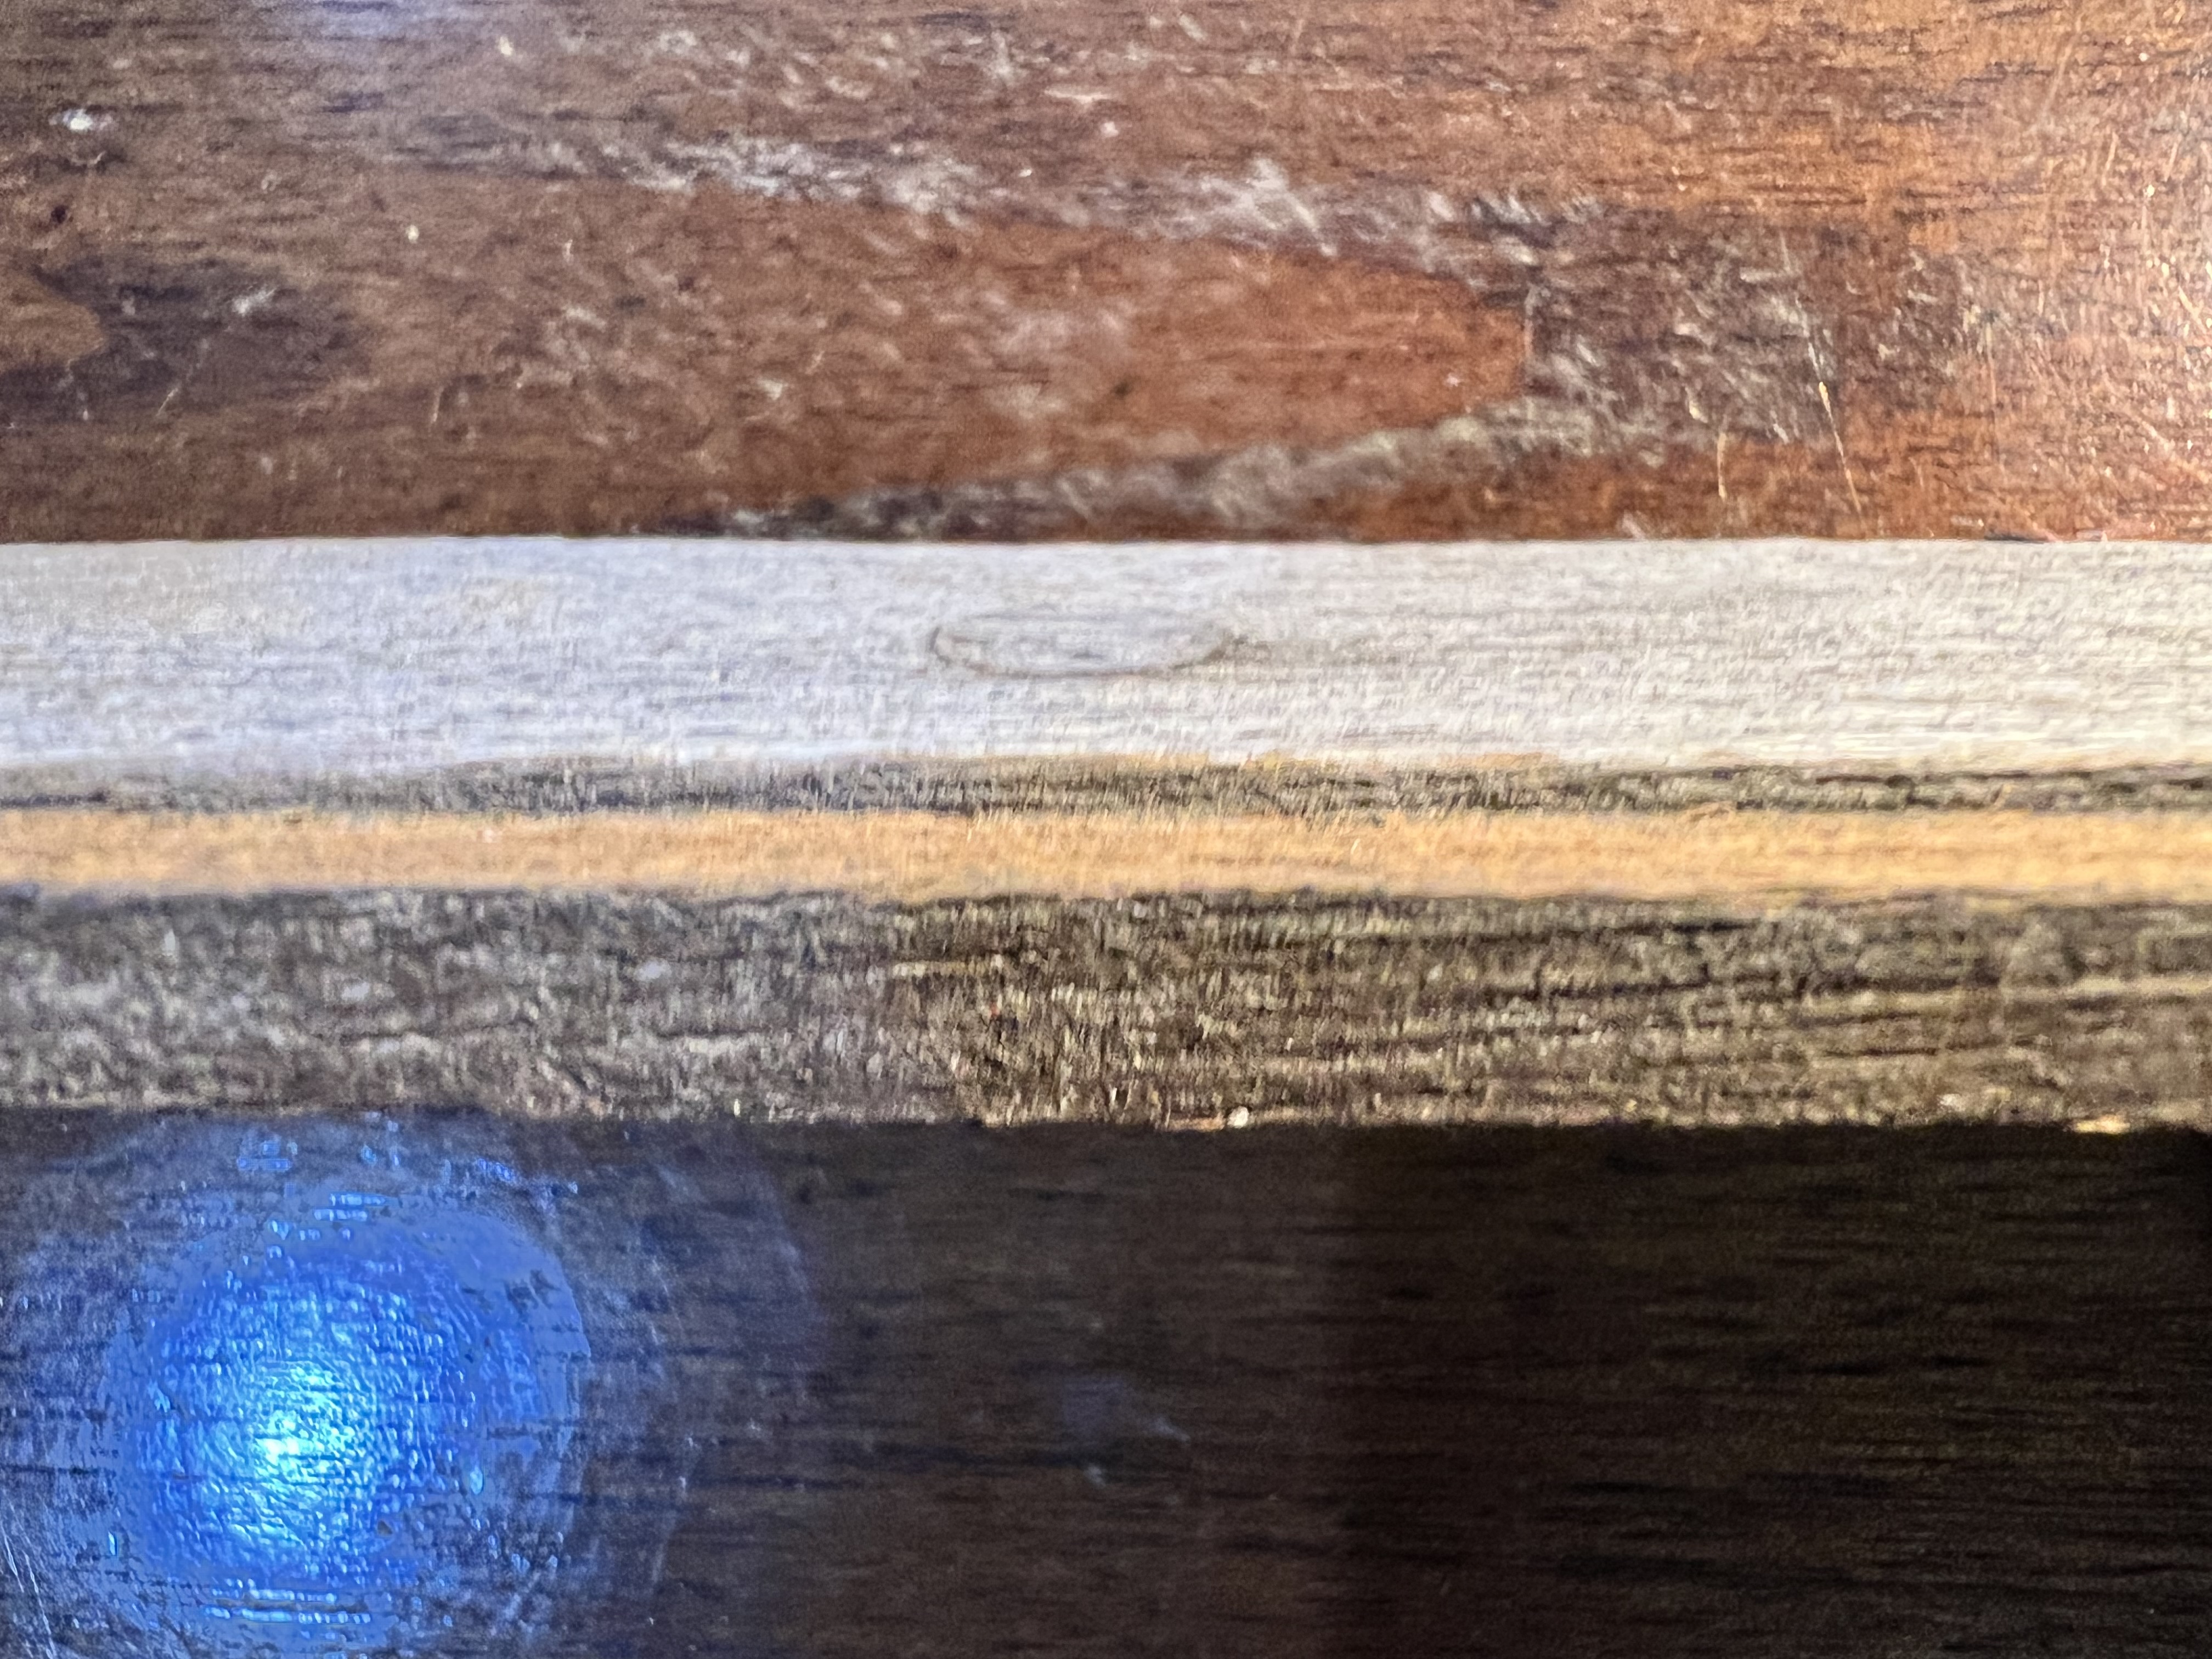
The bungs were paper thin across the whole deck. The top picture (below) is a sideways cut showing a bung and the rabbet on that same piece from the previous pictures. Flipping over the piece to get a good look at it, you can notice how thin the bung is. Also, look at the thin or narrow strip of sealant/adhesive that the factory used to adhere the teak to the deck. The sealant/adhesive did not go around or incorporate in any way the bung screw, so we would have had to hope that the factory epoxied the bung screw well to the deck. The scrap heap of teak showed that this was very common and it would seam that the factory did not not roll the deck with sealant 100% and lay down the teak. They probably squirted the sealant with a caulk gun as each teak strip was being laid. I think the sealant/adhesive served 2 purposes: a) hold the teak strip in place as the deck was being built and b) partially secure it to the deck.
To set the background for this, we interviewed several teak and faux teak services companies. I received very little if any response to international phone calls or emails “Hi, I have a Hallberg-Rassy that needs a new deck, can we talk?”. Ultimately, we chose to use Marty from Osmotech Annapolis for the project and to do the work with the boat in the water due to his experience, his reputation, examples of boats he had done and convenience.
This is what you might want to prepare yourself for. Here are our learnings:
- Budget to replace genoa/jib cars, track and main traveler/track*
- Budget to replace other stainless deck fittings
- Buy all parts early and make sure the contractor is aware before you get a quote so that they aren’t surprised by new things needing to be installed and can plan for them
- Be prepared for surprises like wet areas (we didn’t have this, but friends of ours did) or poor installs/repairs made by others that need to be corrected. We had to beef up the structural support for some of the deck fittings.
- Remove absolutely everything from your boat. Cushions, plates, carpet, canvas, electronics, helm wheel, etc. EVERYTHING.
- Make space somewhere for all of the items you take off your boat. We built simple shelves in our basement and purchased some small plastic bins.
- Put down floor protection inside the cabin everywhere and don’t lift it up until the job is done
- Visit the boat during the last month of hardware installation and watch the installation. This helps you learn your boat and make last-minute decisions to replace or refurbish
- Be prepared to think about the impact of an increased deck thickness as some things might need to stretch to get put back into place such as scupper hoses and locker door hinges.
- Make the choice to remove the chainplates or be satisfied with setting the new deck around them. We left chainplates installed.
- It is easier to do it when you are nearby. You can take everything off your boat and organize it inside your own home. You can visit almost anytime.
- Consider all costs when comparing options including travel, boat transport, fuel, etc. Transporting the boat from the US to Sweden or other destination has a significant associated with that activity.
- Remove the rigging to ensure the most efficient access for the contractor. The work is hard enough on the workers being bent over and on their knees all day, so removing the rigging makes that job much easier.
- Don’t throw away anything until it is 100% complete. Keep all fittings, hardware, etc just in case.
- Take a lot of detailed pictures before the deck is removed showing exact locations of hardware and other features.
- Be prepared to buy some new screws and bolts here and there. It’s not that expensive, but you will be much happier with shiny bolts and screws on your new teak deck. In our case we purchased all new bolts for the tracks which is relatively costly ($300-400) but a no-brainer in my opinion. We also purchased a handful of bolts and screws; less than $50. In almost all cases, this was my decision as Osmotech would have been willing to clean up original bolts and screws.
- Speaking of bolts and screws, don’t be surprised that some of your bolts and screws are bent. That might be intentionally done by the factory to maneuver a bolt through the deck and to a point where it can be fastened below deck.
What we liked about the process:
- The boat stayed in the water covered with a hefty and well-built wood frame/plastic cover that allowed us to almost stand up and walk from fore to aft. The cover kept the boat water tight. The cover was almost as much the genius of the project as the artistic results of the deck itself.
- The marina was less than 20 minutes from our house. It was very convenient for us to drop in.
- Osmotech gave us total access so that we could do other work on the boat.
- All of the hardware removed was stored in the aft cabin and organized. We could take it and work on it as we desired. For example, winches were stored in-tact, and it was easy to find.
- No parts were lost which is amazing.
- Osmotech installed a large diesel heater that heated the space quickly.
- There was progress every time we went to the boat, Osmotech was always working on it and we had great communications via text and calls.
- Osmotech self-performed all of the work from the point of deck removal to the last fitting being screwed into the new deck. They have a wide range of capabilities and knowledge.
It is a very small list, but here is what we would do differently:
- Install old dock lines during the Winter to keep our nice dock lines from chafing
- Removing our old and rusty anchor chain from the anchor locker BEFORE the new deck was installed
End to end, this took exactly 6 months with approximately 2 people working 5 days a week. If you want a budgetary number, I recommend that you call Marty at Osmotech. That is truly the best way to get a quote for your boat. I can go on and on about the quality and craftsmanship, but that would be better to do in person or over a cup of hot chocolate. Just reach out to me if you want to see what a high quality new teak deck looks like.
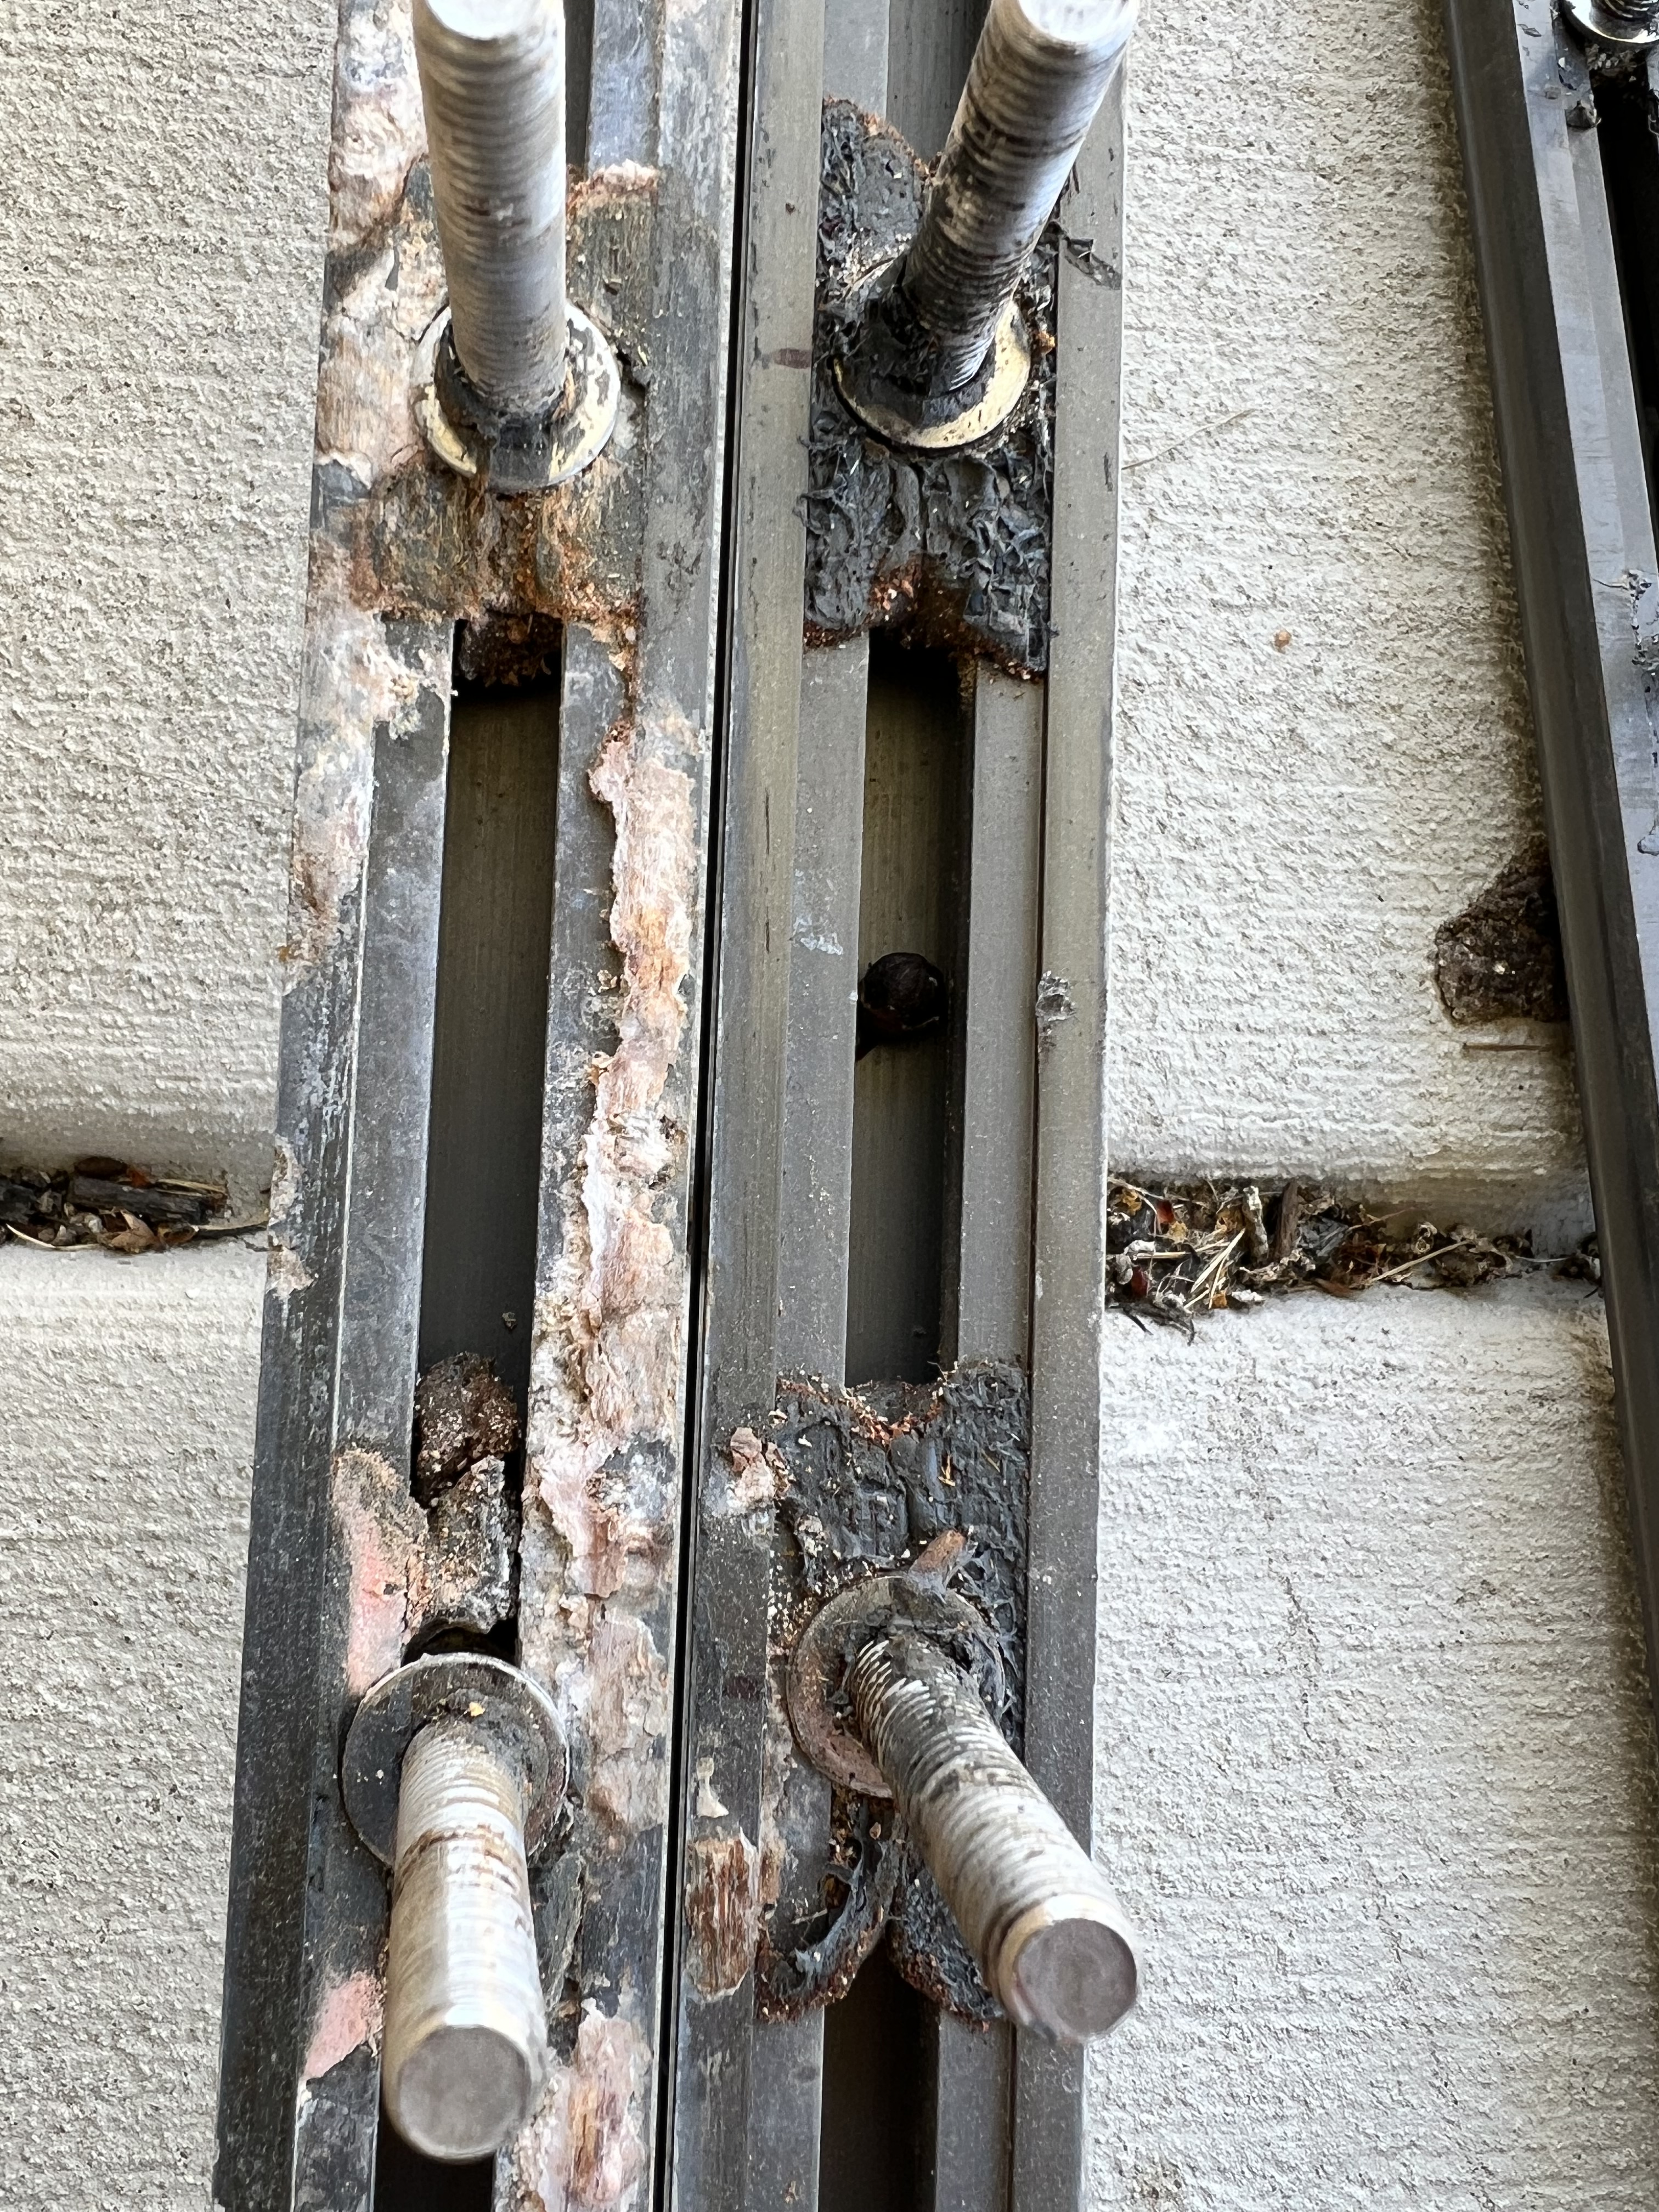
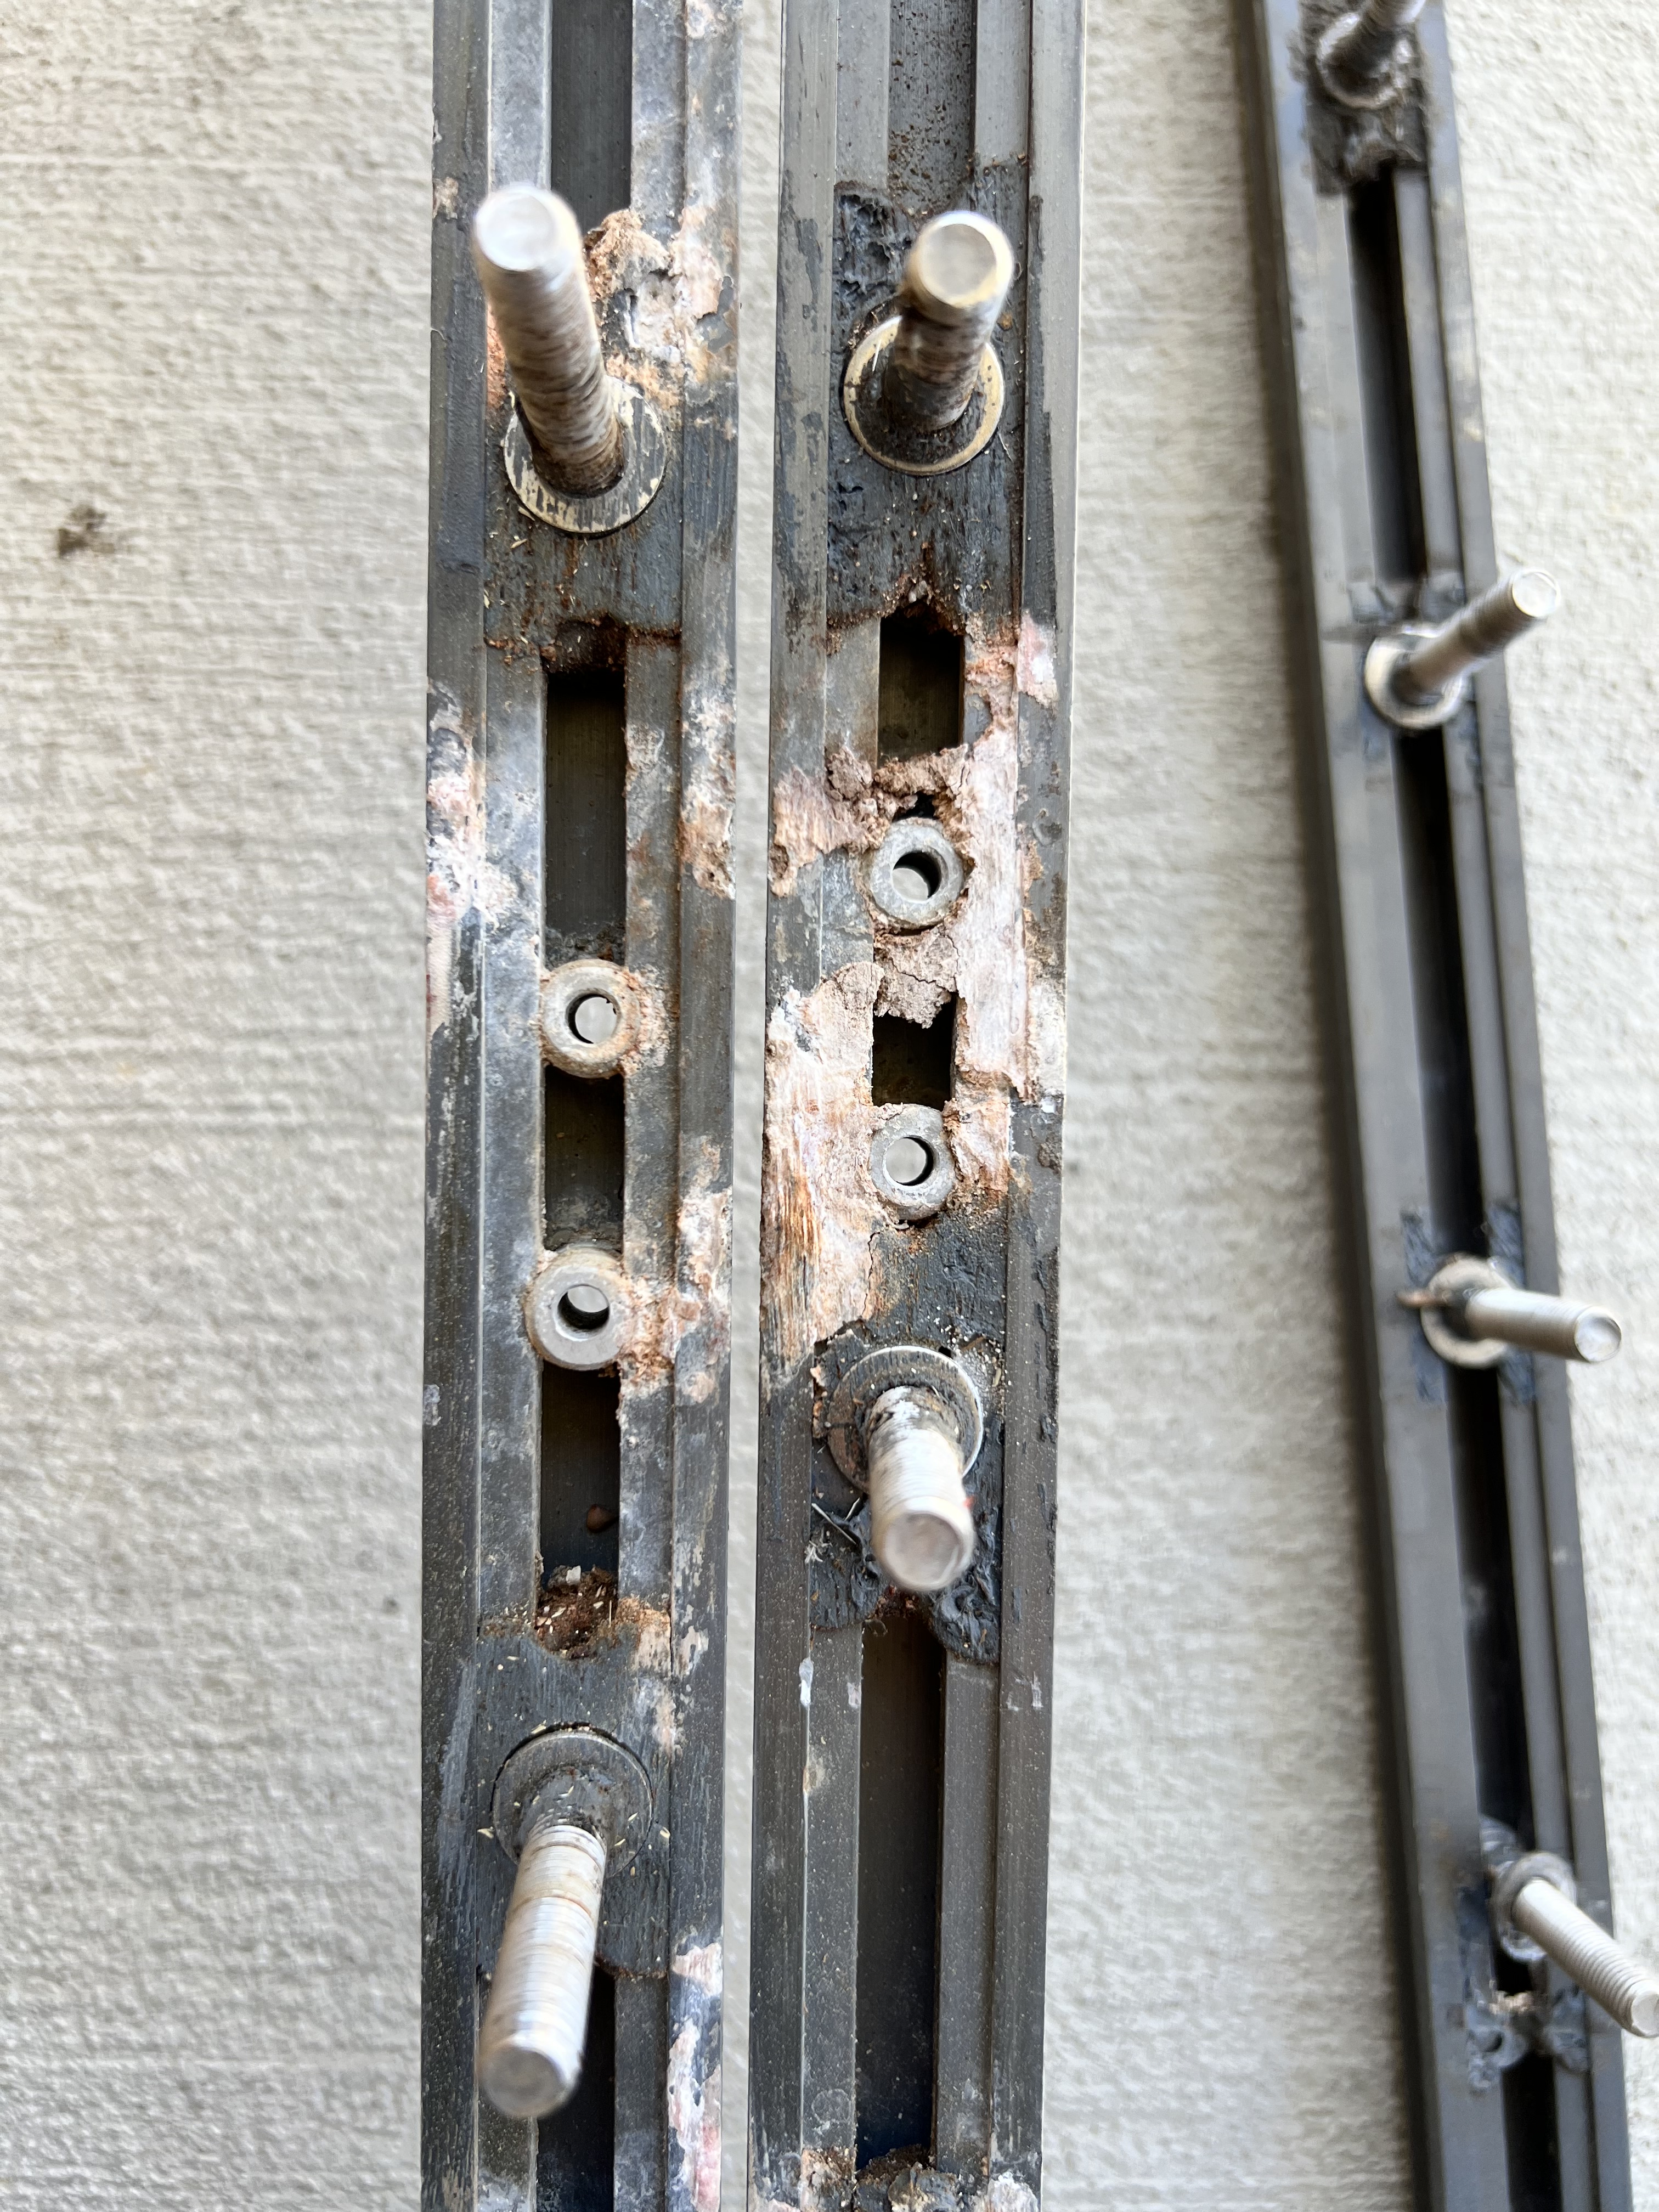
*I observed a significant amount of corrosion on the aluminum Lewmar tracks installed by the factory. The corrosion was prevalent anywhere where there was an end stop fastened through the track and even where the bolts were underneath the track. In my estimation all of this was due to disimilar metals (stainless and aluminum) in contact. It wasn’t everywhere there was a bolt, but it was enough for me to decide to replace everything.